
Welcome to Meteora—a decentralized finance (DeFi) project on the Solana blockchain that provides efficient, sustainable liquidity! If you’re new to crypto or DeFi, don’t worry—this guide will break down Meteora’s Liquidity Pools (especially DLMM pools), price ranges, and how to view and analyze them in easy, beginner-friendly language. Let’s get started!

What is Meteora?
Meteora is a DeFi platform built on the Solana blockchain. Solana is known for its fast, low-cost transactions, and Meteora aims to solve the problem of insufficient liquidity in Solana’s ecosystem. This makes trading smoother, cheaper, and more profitable for liquidity providers (like you).
Meteora offers a special type of liquidity pool called DLMM Pools (Dynamic Liquidity Market Maker Pools). These pools allow users—including developers, investors, and traders—to manage their funds and trades flexibly, while earning rewards like trading fees.
Basics of Liquidity Pools
1. What is a Liquidity Pool?
A liquidity pool is like a “fund pool” containing two cryptocurrencies (e.g., $SOL and $USDC). These pools enable people to trade on decentralized exchanges (DEXs), such as swapping $SOL for $USDC.
There are two main types of liquidity pools on Meteora:
- Two-Sided Pools (Balanced Pools): You deposit both tokens (e.g., equal amounts of $SOL and $USDC), and the pool automatically balances them to support trading. This is safer but requires both assets.
- Single-Sided Pools: You only deposit one token (e.g., just $SOL), and Meteora adjusts the pool’s funds based on market conditions. This is more flexible but can carry higher risks (we’ll explain later).
2. What are DLMM Pools?
DLMM (Dynamic Liquidity Market Maker) is Meteora’s innovative feature. Unlike traditional pools where funds are spread evenly, DLMM pools distribute funds across different “price ranges” (called bins). Each bin represents a specific price point or range, allowing for more efficient liquidity and reduced risks like “impermanent loss” (a common risk in DeFi where prices fluctuate).
Users can allocate their funds to specific price ranges in a DLMM pool to earn trading fees, making it a powerful tool for both earning rewards and managing risk.
Why Are Price Ranges Important?
Price ranges (or bins) are a key part of DLMM pools because they determine where your funds “work” within the pool.
- If you deposit funds into a high price range, the pool might automatically sell the token (e.g., “sell” or “dump”) when the token’s price rises to that range, earning a profit for you or the liquidity provider.
- If you deposit into a low price range, the pool might automatically buy the token (e.g., “accumulate” or “buy low”) when the price falls to that range, increasing your holdings.
How Developers Use This:
Some developers or large investors might use single-sided pools and price ranges to manipulate token prices. For example, a developer could deposit only one token (like $TRUMP) into a high price range. When $TRUMP’s price rises to that range, the pool automatically sells $TRUMP for another token (like $USDC), allowing the developer to “dump” (sell off) their tokens for profit. This can explain why some new tokens surge in price and then crash, potentially harming smaller investors.
As a beginner, understanding these mechanics helps you avoid risks and identify opportunities to profit.
How to View and Analyze Meteora’s Liquidity Pools and Price Ranges
Here are beginner-friendly, step-by-step instructions for each:
Method 1: Use a Watch Wallet to View (Simple and Intuitive)
This method is quick and easy, perfect for beginners who want to check active pools and price ranges.
- Find the Developer’s Wallet Address
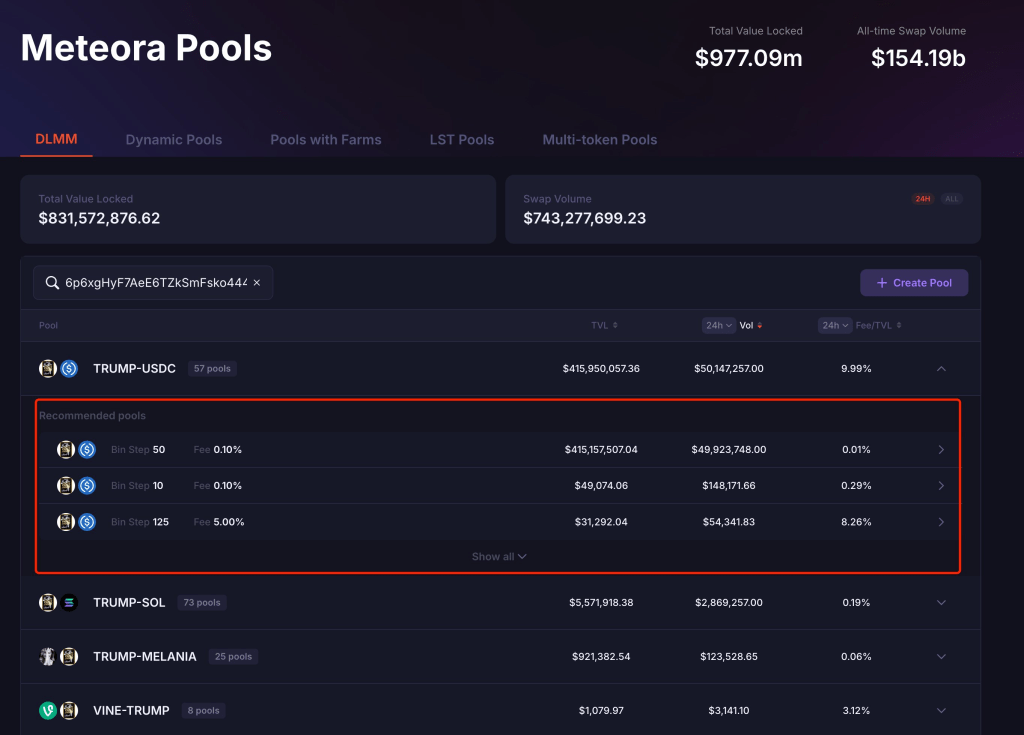
- Use tools like DeBot (https://debot.ai?inviteCode=175623) or GMGN (https://t.me/gmgnaibot?start=i_sxsy7oyJ). Enter the token’s contract address (e.g., $TRUMP’s address 6p6xgHyF7AeE6TZkSmFsko444wqoP15icUSqi2jfGiPN) to find the developer’s wallet address (e.g., 5e2qRc1DNEXmyxP8qwPwJhRWjef7usLyi7v5xjqLr5G7).
- Add a Watch Wallet
- Open your wallet (e.g., Phantom Wallet) and select “Add/Connect Wallet” or “Watch Address.”
- Enter the developer’s address (e.g., the one above), but don’t use your real funds—just monitor it. This creates a “watch-only” wallet to track activity without risking your money.
- Connect to Meteora and View Pools
- Visit the Meteora website (https://app.meteora.ag) and connect your Phantom wallet.
- Click “Portfolio” at the top of the page to see all liquidity pools (Pools) created by the developer.
- Select a pool (e.g., $TRUMP-USDC pool) to see its price ranges (bins) and position (Position) details.
- Click on a specific position to view its price range, fund distribution, and any unclaimed fees.
Advantages: This method is simple, fast, and intuitive—great for quickly checking active pools and price ranges.
Disadvantages: You can’t see historical data if liquidity has been removed (withdrawn) from the pool.
Method 2: Calculate Price Ranges Using On-Chain Data (More Comprehensive, but Requires Math)
This method is more technical but allows you to analyze removed pools or get precise historical data. Don’t worry—we’ll walk through it step by step:
- Find the Developer’s Liquidity Addition Transactions
- Go to a Solana blockchain explorer like Solscan (https://solscan.io).
- Enter the developer’s address (e.g., 5e2qRc1DNEXmyxP8qwPwJhRWjef7usLyi7v5xjqLr5G7) and go to the “Defi Activities” tab.
- Filter “Action” for “ADD LIQUIDITY” to find transactions where the developer added liquidity, especially to single-sided pools.
- Check Transaction Details
- Click on a liquidity addition transaction (e.g., https://solscan.io/tx/284UXTrgWNFFXTovbCAQsJA8U5mW4rntwa8KyRvSmhNYf7cus1rtskiVqwNkErdosDMUsJfxXm8KgkCf1DzTPmPr).
- Verify if it’s a single-sided pool (e.g., only $TRUMP or only $USDC was added).
- Gather Necessary Data
- Bin Step (Price Interval): On the pool’s Solscan page (e.g., 9d9mb8kooFfaD3SctgZtkxQypkshx6ezhbKio89ixyy2), find the “binStep” value (e.g., 50 basis points, or 0.005 as a decimal).
- Lower Bin ID and Upper Bin ID (Price Range Start and End): In the transaction details, look for “initializePosition” to find lowerBinId and width (the width of the bin range). Calculate upperBinId = lowerBinId + width – 1.
- Token Decimals (Precision): Check the decimals of the two tokens involved (e.g., $TRUMP and $USDC, often found on their token pages—decimals of 6 means 6 decimal places after the point).
- Calculate the Price Range
Use the formula to calculate the minimum and maximum prices:- Minimum Price: min_price = (1 + bin_step/10000) ^ lower_bin_id / 10^(decimals_B – decimals_A)
- Maximum Price: max_price = (1 + bin_step/10000) ^ upper_bin_id / 10^(decimals_B – decimals_A)
Where: - bin_step is the price interval (e.g., 50 basis points = 50/10000 = 0.005).
- lower_bin_id and upper_bin_id are the start and end of the price range.
- decimals_A and decimals_B are the decimals of the two tokens (e.g., both $TRUMP and $USDC might be 6).
If bin_step = 50 (0.005), lower_bin_id = 1062, upper_bin_id = 1107, decimals_A = 6, and decimals_B = 6, the calculation might look like:- Minimum Price: min_price = (1 + 0.005) ^ 1062 / 10^(6-6) ≈ 199.69
- Maximum Price: max_price = (1 + 0.005) ^ 1107 / 10^(6-6) ≈ 249.94
This means the price range is approximately 199.69 to 249.94 for the token pair.
Advantages: You can view historical data, even if the pool no longer exists.
Disadvantages: This method requires some technical knowledge and math, which might be challenging for beginners.
Beginner Tips and Cautions
- Understand the Risks
- Single-sided pools can be used by developers to “dump” (sell off) or “accumulate” tokens, causing significant price swings that could lead to losses for investors.
- “Impermanent Loss” is a common risk for liquidity providers, especially when token prices fluctuate a lot. This happens when the price of the tokens in the pool changes compared to when you deposited them.
- Use Reliable Tools
- Use tools recommended by 子布, like DeBot, GMGN, and OKX, to monitor developer activity, but be aware these tools are still being improved and might miss some details.
- Always check the transparency of tokens and pools to ensure safety before investing.
- Learn and Practice
- Learn more basics from Meteora’s documentation (https://docs.meteora.ag) or community resources like Solana Guides (solanaguides.com).
- Start with small amounts of funds for testing—don’t invest too much at once until you’re comfortable.
Frequently Asked Questions (FAQ)
Q1: Do I need a technical background to use Meteora?
A: Not necessarily! Using a watch wallet to view pools is simple and doesn’t require technical skills, but calculating price ranges (Method 2) involves some math and blockchain knowledge. If you’re just starting, use Method 1 and gradually get familiar with the platform.
Q2: What’s the difference between single-sided and two-sided pools?
A: Two-sided pools require both tokens, have lower risk, and may offer stable returns. Single-sided pools only need one token, are more flexible, but carry higher risks (e.g., potential manipulation by developers or price volatility).
Q3: How can I avoid market manipulation?
A: Monitor developer activity using tracking tools, check their liquidity pool actions (like adding or removing funds), and combine this with price charts (K-line charts) and other market data to make informed decisions.
Next Steps: Explore and Practice
- Visit the Meteora website (https://app.meteora.ag), create a Phantom wallet, and try connecting to explore pools.
- Join Solana or Meteora communities (like Discord or Telegram) to ask experienced users questions and learn from others.
- Follow NEZHA and other experts’ posts on X or crypto forums to learn advanced tips and strategies.
We hope this guide helps you confidently step into the world of Meteora and liquidity pools! If you have any questions, feel free to ask in the community or on the tools—we’re here to grow together!

Leave a comment